 Most of the information here is for Warzone 3.1 and above.
Edit World (Map Editor)
- Aubergine
Introduction
This is a very old map editor. For recent releases of Warzone you should use FlaME instead.
History of Edit World
<add history from Rman and LA here>
The Edit World guide shown below was released in January 2000 by Lord Apocalypse, a member of NEWST. It has been reformatted and edited in a few places to better suit this wiki (you can download the original files).
Installation
You will need a full installation of Warzone 2100 to use EditWorld. EditWorld loads Warzone 2100 game data, so you may have to change the destination directory from the default if you have installed Warzone 2100 in a non-standard directory.
| Version | Install Guide |
|---|---|
.wdg | This version of edit world saves maps in .wdg (old warzone) format. Download and install BetaWorldEditor32.exe. |
.wz | This version saves maps in Warzone Zip (.wz) format, compatible with newer releases (eg. 2.x branch).
Download editworld32c.exe and use that .exe as the main edit world app. There is more information about this version in the forums, including some .dll files that might be missing, etc. Note that this guide was written before the release of the editworld32c.exe. |
 You need to install BetaWorldEditor32 first.
Render modes
There are two rendering modes for EditWorld:
- The software-rendering version should work on any machine with DirectX 6 installed, as long as the Windows colour depth is set to 16bit (you can do this using Start → Settings → Control Panel → Display → Settings → Colors).
- The hardware-rendering version should work on any machine with DirectX 6 installed and a 3d accelerated video card that features 8MB of video memory and the ability to draw textured 3d in a window, again, ensure your windows display bit depth is set to 16. This version has been tested with the Permedia 2, Matrox G200, ATI Rage Pro and Riva TNT video cards. Voodoo 1 and Voodoo 2 are not supported.
File Types
The following file types are used in Edit World:
| Extension | Notes |
|---|---|
.lnd | This is the EditWorld internal map storage format, for loading and saving work on in-progress maps. Always keep a copy of your map in this format so that you can make changes to it in EditWorld. You dont want to lose this file, trust me. |
.clp | This is the EditWorld clipboard file format. EditWorld can export and import clipboard contents (see Drop Down Menu Options, File Menu for more information). |
.pcx | This is a standard bitmap file format used for storing pictures. EditWorld can import and export tile and height maps as .pcx files (see Drop Down Menu Options, Map Menu). Most modern paint packages will load and save .pcx files. If you experience problems loading and saving .pcx files, be sure that your Paint Package supports a recent version of the .pcx standard, as some older versions only support two colours. Some packages have options that allow you to choose which version of the .pcx standard to use. EditWorld has been tested with Version 5 of the .pcx standard. The .pcx format is used with the tilesets as well for all of you that want to create custom tiles. More on that later |
.ebr | This is the EditWorld edge brushes file format. EditWorld can import and export sets of edge brushes (see Drop Down Menu Options, File Menu). I will go into more detail about these as we get deeper into the help file. |
.ett | This is the EditWorld tile properties file format. EditWorld can import and export sets of tile properties (see Drop Down Menu Options, File Menu). Same as above, more later. |
.wdg | EditWorld exports maps in the .wdg format for use in the game. But what they dont tell you is that these also contain the info you need to be able to create custom mods ;) More on this as we progress. Note: .wdg format maps are not compatible with recent versions of Warzone 2100. See the ".wz version" in the installation section for a more up-to-date format. |
.eds | Here's one of the two pumkin didnt mention. This little file contains the information on everything to include in to the map. Very brief overview here. Tells to include tileset, names.txt file, the ebr settings, ett settings, features.txt, stats, etc... more detail later. Cant overload your brains yet hehehe. |
.txt | Your standard text file. If you've ever been curious enough to look into the names.txt or objectlist.txt you should have noticed a lot of confusing entries. Well be confused no more. These files are where all the avaliable units and structures are kept. Anything thats been added in each patch should eventually makes its way here. Done here? Lets continue. |
Overview and General Principles
EditWorld is the map editor for Warzone 2100. It exists as a 32 bit Windows application. A modified version of it was used in creating all the levels for the original game. Using EditWorld you can create your own maps for use in the Skirmish and Multiplayer game modes.
A Warzone 2100 map is made up of a height map, a tile map, gateway information, some structures and some optional features. All of these can be edited in EditWorld.
The height map is a grid of height values. At one end of the scale is sea level, and at the other the top of the highest mountain in the game.
The tile map is a grid of textures. These textures are stretched over the height map so as to provide graphical detail. Using the textures you can create areas of grass, mud, concrete, sand or snow, and then run roads through them. There are three sets of tiles or textures, known as datasets. One dataset exists for each Campaign in the single player game mode. These are not to be confused with technology sets, which are independent of the map on which they appear.
Gateway information exists to keep the pathfinding in the game running smoothly.
Some of the 3D objects that appear in the game world are known as structures. A good example would be a player building or unit.
Other, non-player 3D objects, such as boulders, are known as features.
Pretty dry isnt it... well thats why this file came about. To teach you new and fun tricks. Ok, here's my run down of some of the above.
A warzone 2100 map is made up of:
- height map
- tile set
- gateway routing info
- player data
- tile types (explained later)
- structures (explained in advanced section)
- optional edge brush info
- various other files i will get into later
Height map = greyscale .pcx file with black being sea level and white being the highest point of the map. Best reference I have using a height map is my own map, rolling hills. If youve already played it you know what im talking about. Its a beautiful map.
Now the next statement from the original doc has me confused. Are they refering to tile types or tile set? Who knows.. and i have no comment on it.
Gateways. Oh joy, they are correct. You need a good gateway system to keep your units from getting stuck anywhere. Ill have an entire section devoted to this very sore topic later.
Last two entries should be pretty explanitory.. no point in saying that over again.
Credits & Contributors
These people get the bigget thanks for all the work theyve done so for all of us, and the help they have provided me with:
- Shang - Original edit world faq, and several 3rd party add-ons, plus his first try at adding custom tilesets
- HB - For his amazingly easy TMLink program that has helped all of us add custom tiles
- Maynard - For his help in allowing me to understand some features i didnt know or use, and everything hes done or helped me with through out this project.
- Striker - For his help as my guinea pig through the begining and his help with designing some really cool height maps
- Troman - for being soooo annoying and trying to prove us wrong on alot of different things, and als for helping with our understanding on some less known features
- Alex McLean - For his support when i first started this project several months ago.
As for everyone else, thanks for giving me a reason to write this file for you. Hopefully all of you will find help and use with this and create some new and interesting maps for the rest of us. And as always, if you create a new map please send it to me so i can post it on my site for all to see.
Updates
.01c update info:
- Added section on creating custom maps
- Tutorial on makewdg
- Item on custom tilesets
- Added updates section
- Decreased wav file size
- Minor spelling corrections
- Misc other changes
User Inteface
When you run EditWorld you are presented with the EditWorld display.
The Title Bar
At the top of the screen is the title bar, which shows the name of the .lnd (map) file that you are currently editing. On the right hand side of this bar are the standard Windows minimize, restore and close buttons.
The Drop Down Menu Bar

The next line down is the drop down menu title bar. See the section entitled "Drop Down Menu Options" for more information on this.
Icon Bars
Below the drop down menu title bar are the two icon bars.

For a complete description of each icon and it's function see the section entitled "Icons". Tool tips, activated by holding the mouse pointer over an icon, are available for a quick reminder of an icon's function. It is also possible to drag and drop rows of icons so as to rearrange the icon bar display. Some people find it useful to only have one icon bar line (thus freeing up screen space for the map and tile displays). You can achieve this by dragging the bottom row of icons over the top row of icons.
Player Selection and Enable Buttons
 Moving down the screen, the left edge of the display features the player selection and enable buttons. Those buttons marked e[number] (e.g. e5) toggle the display of structures belonging to that player in the map views. Those buttons marked P[number] (e.g. P4) allow you to select a player to edit. All structures and vehicles that you paste on the map will belong to the player selected at the time of placement.
Note: Some Warzone 2100 multiplayer maps feature Scavengers. You can include Scavengers in your maps, but there are several limitations. Scavengers must take up the slot occupied by player 7, and because of this they can only appear on maps featuring fewer than seven players. Scavengers will not appear in One Player Skirmish games. If you place Scavengers on a map, be sure to give them a factory, a power generator and an oil derrick. This will allow them to build units. Without these three buildings maps featuring Scavengers may not work properly. Something i guess pumkin forgot to mention, when you use scavengers always check and make sure that if you are doing say a 4 player map, you do not enable any player after 4 except 7. ie have player e0. e1, e2, e3, and e7 pressed in. Make sure that players e4, e5, e6 are not pressed. If you dont you will get an error that says one or more players do not have trucks when you try to compile
Tile Texture Display
Once you have loaded a .lnd (map) or data set the black area immediately to the right of the player selection and enable buttons will fill up with available tile textures, structures and features. This is the tile texture display. Each tile texture, structure and feature is numbered. You can scroll down through the list using the slider bar and arrow buttons on the right edge. The currently selected tile texture, structure or feature is highlighted with a white rectangle. Clicking on another tile texture, structure or feature will select it. Double clicking on a tile texture will bring up the Paint Orientation dialog box (see "Rotation & Flips" for details).
3D Map Display
To the right of the tile texture display is the 3d map display. This shows the map, as it will appear in the game.
You can use this view to edit almost all aspects of the map. When you are editing the height map, each vertex is displayed as a white dot at the corner of a tile texture.
Use the cursor keys to move around the map. You can rotate the 3d map display by holding down the left shift key and the left mouse button while moving the mouse in this view. See also Drop Down Menu Options, View Menu, Look North. It is also possible to change the depth of the display using the Key Commands W and Q.
There is an overlay on the top left corner of the 3d map display known as a locator map. This shows the whole map in miniature. The crosshair on this display shows the current camera position. You can move it by clicking anywhere on the map. See also Drop Down Menu Options, Options Menu, Locator Maps, Show Heights, Show Textures and Large Scale.
2D Map Display
The 2d map display exists as a section that can be dragged up over the 3d map display. It shows a top down view of the map without any height information.
As in the 3d map display, you can use this view to edit almost all aspects of the map. It is recommended that you do not edit map heights in this display, as you will not be able to see the results of what you have done.
Again, the cursor keys can be used to move around the map. You can also use the slider bars at the edge of this display for the same purpose.
There is also a locator map overlay on the top left corner of the 2d map. As in the 3d map display, this shows the whole map in miniature. The crosshair on this display shows the current camera position. You can move it by clicking anywhere on the map. See also Drop Down Menu Options, Options Menu, Locator Maps, Show Heights, Show Textures and Large Scale.
Information Bar
At the bottom of the EditWorld window is the information bar.
Hold the mouse over a menu option or icon and the left of the information bar will display a quick description of that option or icon's purpose.
- Position: This displays the current camera co-ordinates.
- Angle: This displays the current camera angle.
- This: The current cursor position in tile (T) and world (W) co-ordinates is displayed on the far right of the information bar.
Rotation & Flips
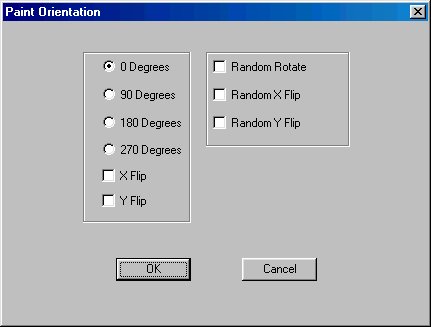
The Paint Orientation dialog appears when you double-click on a tile texture.
Rotation Angle
Choose a tile texture rotation from 0 Degrees, 90 Degrees, 180 Degrees or 270 Degrees. You can then paint using the rotated version of the tile texture. The rotation is stored as part of the tile's Texture Flags. See also Drop Down Menu Options, Map Menu,Reset Texture Flags.
X Flip
Tick this box to flip the tile texture horizontally. You can then paint using the flipped version of the tile texture. The flip is stored as part of the tile's Texture Flags. See also Drop Down Menu Options, Map Menu, Reset Texture Flags.
Y Flip
Tick this box to flip the tile texture vertically. You can then paint using the flipped version of the tile texture. The flip is stored as part of the tile's Texture Flags. See also Drop Down Menu Options, Map Menu, Reset Texture Flags.
Random Rotate
Tick this box to rotate the tile texture randomly. You can then paint using randomly rotated versions of the tile texture. The rotation is stored as part of the tile's Texture Flags. See also Drop Down Menu Options, Map Menu, Reset Texture Flags.
Random X Flip
Tick this box to randomly flip the tile texture horizontally. You can then paint using randomly flipped versions of the tile texture. The random flip is stored as part of the tile's Texture Flags. See also Drop Down Menu Options, Map Menu, Reset Texture Flags.
Random Y Flip
Tick this box to randomly flip the tile texture vertically. You can then paint using randomly flipped versions of the tile texture. The random flip is stored as part of the tile's Texture Flags. See also Drop Down Menu Options, Map Menu, Reset Texture Flags.
Note: The above options all edit the tile's Texture Flags. These are displayed in text form on the tile in the Tile Texture Display.
Drop Down Menu Options
Topics here will cover all aspects of the menus and what each option does or is supposed to do.
File Menu | |
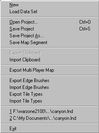
(click to zoom) | NewThis deletes the current map and tileset, allowing you to start again as if you had just run EditWorld.
Open Project (Ctrl + O)This brings up a file requestor allowing you to select a .lnd (map and dataset) file to load. See the File Types section for more information on .lnd files. Save Project (Ctrl + S)This saves your current map and dataset over the .lnd file from which it was loaded. If you did not load the current map and dataset from a .lnd file, a file requestor appears allowing you to select a filename for your .lnd file. Save Project AsThis brings up a file requestor allowing you to save your map and dataset as a .lnd file. Always make sure you use this when starting on a new map. If not it will save over a previous map, and that wouldnt be good Save Map SegmentThis allows you to export a rectangular section of the map as a new .lnd (map and dataset) file. Enter the top left tile co-ordinate of your segment in the Starting X and Starting Y fields of the presented dialog box. Enter the width and height in tiles of your segment in the Width and Height fields. Then select a .lnd filename to save your segment to. Export ClipboardThis brings up a file requestor allowing you to export the current clipboard contents as a .clp (clipboard) file. See Icons, Copy Marked Area To Clipboard for more information on the clipboard. Import ClipboardThis brings up a file requestor allowing you to import clipboard contents from a .clp (clipboard) file. See Icons, Copy Marked Area To Clipboard for more information on the clipboard. Export Multi Player MapThis allows you to export the map ready for use in Warzone. Export Edge BrushesThis brings up a file requestor allowing you to export the current set of edge brushes as a .ebr file. See Drop Down Menu Options, View Menu, Edge Brushes for more information on edge brushes. Import Edge BrushesThis brings up a file requestor allowing you to import a set of edge brushes from a .ebr file. See Drop Down Menu Options, View Menu, Edge Brushes for more information on edge brushes. Export Tile TypesThis brings up a file requestor allowing you to export the current set of tile properties as a .ett file. See The EditWorld Display, Tile Texture Display for more information on tile properties. Import Tile TypesThis brings up a file requestor allowing you to import a set of tile properties as a .ett file. See The EditWorld Display, Tile Texture Display for more information on tile properties. Recently Accessed .lnd Filenames ListSelecting the current .lnd (map and dataset) file from this list does nothing. Selecting any other .lnd file from this list will load that .lnd file. ExitThis gives you the option to save your work as a .lnd (map and dataset) file before closing EditWorld. |
Map Menu | |
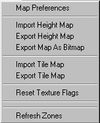
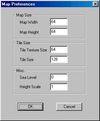
(click to zoom) | Map PreferencesThis brings up the Map Preferences dialog (click to zoom): Map WidthChange the width of the map in tiles. Be aware that changing this will delete the current map and dataset. Use the Save Map Segment option on the File Menu to change the size of an existing map. Note that changing the map size results in a new blank map at the new size. Map HeightChange the height of the map in tiles. Be aware that changing this will delete the current map and dataset. Use the Save Map Segment option on the File Menu to change the size of an existing map. Note that changing the map size results in a new blank map at the new size. Note: The maximum map size is limited to 250 * 250, as this is the largest the game, and specifically the gateway system, can safely handle. Tile Texture SizeThis value has been set for Warzone 2100. Changing it may cause EditWorld or Warzone 2100 to function incorrectly. Tile SizeThis value has been set for Warzone 2100. Changing it may cause EditWorld or Warzone 2100 to function incorrectly. Sea LevelThis value has been set for Warzone 2100. Changing it may cause EditWorld or Warzone 2100 to function incorrectly. Height ScaleThis can be used to scale the height map up in size. Values between 1 and 16 are legal. Values higher than 4 are not recommended. Import Height MapThis brings up a file requestor allowing you to select a .pcx (bitmap) file to import as a height map. The file you import must have pixel dimensions that match the tile dimensions of the current map. White in the bitmap will translate to high ground in the map, and black in the bitmap will translate to low ground in the map. This allows you to rough out a landscape in greyscale using your favourite paint package, and then import it into EditWorld to tweak the final result in 3D. Export Height MapThis brings up a file requestor allowing you to export the current height map as a .pcx (bitmap) file. You can then edit this bitmap in your favourite paint package, and use the Import Height Map option to import the changes back into EditWorld. Import Tile MapThis brings up a file requestor allowing you to select a .pcx (bitmap) file to import as a tile map. The file you import must have pixel dimensions that match the tile dimensions of the current map. Black in the bitmap will translate to the first tile in the current dataset, very dark grey (RGB : 1,1,1) to the second and so on. This allows you to rough out large areas of tiles using your favourite paint package, and then import the result into EditWorld to tweak the transitions between different terrain types. A good way to make sure that you are using the right shades of grey is to start with a tile map .pcx file that EditWorld has exported. Export Tile MapThis brings up a file requestor allowing you to export the current tile map as a greyscale .pcx (bitmap) file. You can then edit this bitmap in your favourite paint package, and use the Import Height Map option to import the changes back into EditWorld. Reset Texture FlagsThis clears all of the texture flags, as shown in the texture selection window. See The EditWorld Display, Tile Texture Display section for information on texture flags. Refresh ZonesThis refreshes the routing gateway numbers on the 2d map display. For more information on routing gateways, see Icons, Create Routing Gateway. |
View Menu | |
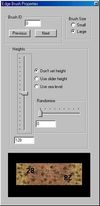
(click to zoom) | Look North (F1)This aligns the camera in the 3d map view so that it faces north. Zero Camera PositionThis resets the camera to a useable position in the 3d map display. Lock CameraThis emulates isometric projection, locking the camera in one axis so that you can rotate the view left and right easily. Free CameraThis switches off the effects of Drop Down Menu Options, View, Lock Camera (see above). World (F2)This switches the 2d map display back to showing the 2d map (see Drop Down Menu Options, View, Edge Brushes). Edge Brushes (F3)This switches the 2D map display to showing the edge brush display. Edge brushes allow you to quickly blend areas of one tile texture with another. The 3 by 3 tile grid at the top left of the display shows the brush tile texture (in the middle) and the outside corners of the brush. The 4 by 4 grid on the right shows the inside corners of the brush. These textures can be edited in the normal way. You can also change the triangle direction on each of these grid squares using the relevant icon. The Edge Brushes dialog will also appear (click to zoom): Brush IDThis is the identification number of the brush that you are editing. Brush SizeThis allows you to choose what size of brush to paint with. The small brush is 2 by 2 tiles in size, and the large brush is 3 by 3 tiles in size. HeightsThis allows you to choose a height for the brush. When this option is switched on, the height you have chosen (either that shown by the slider bar or sea level) will be pasted into the height map wherever the brush is pasted. Using this option you can quickly create areas of raised ground or water. |
Options Menu | |
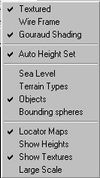
(click to zoom) | TexturedThis switches back to textured display mode in the 3d map display (see Drop Down Menu Options, Options Menu, Wire Frame. Wire FrameThis switches to wire frame display mode in the 3d map display. Wire frame mode can be useful in editing map heights. Gouraud ShadingThis toggles Gouraud shading on and off in the 3d map display. Auto Height SetWhen this option is ticked, painting with a water tile will automaticly set the terrain height under the tile to the sea level. Sea LevelThis displays sea level on the 3d map view. Terrain TypesWhen this is switched on EditWorld displays the terrain type of each tile texture as a square coloured overlay in the Tile Texture Display. A tile's terrain type determines which vehicles can travel over it. For instance, only hover and VTOL vehicles may cross water tiles. ObjectsThis toggles the display of objects on the 2d map display, the 3d map display and the locator maps on and off. Bounding SpheresThis toggles bounding spheres around objects in the 3d map display on and off. Locator MapsThis toggles the locator maps on and off in the 2d and 3d map displays. Show HeightsThis sets the locator maps in the 2d and 3d map displays to a mode showing height information. Show TexturesThis sets the locator maps in the 2d and 3d map displays to a mode showing tile texture information. Large ScaleThis toggles between showing large and small locator maps in the 2d and 3d map displays. |


Icons
In this section we look at the icons on the toolbar:

New
Same as choosing "New" from the File Menu.
Open
Same as choosing "Open Project" from the File Menu.
Save
Same as choosing "Save" from the File Menu.

Undo (CTRL + U)
Undoes the last operation performed. Note that this does not work with all operations. An undo history is stored so that several operations can be undone, one at a time.
Note: This command really doesnt work well if at all so always save before making making major changes you're not sure if you will like or not.
Redo
Redoes the last operation to have been undone. An undo history is stored so that several operation can be redone, one at a time.

Select (Esc)
Changes the mouse pointer to select mode. You can then select a feature or structure with the mouse in the 2d and 3d map displays.
Move
Changes the mouse pointer to move mode. You can then click on a feature or structure to select it, and holding down the left mouse button drag it to a new location to move it.
Rotate Object
This changes the mouse pointer to rotate object mode. Clicking on an object in the 2d or 3d map display will then rotate that object 90 degrees clockwise. Be aware that although the object itself is rotated, its footprint is not. It is not usually a good idea to rotate a rectangular object, as units will use the footprint for pathfinding and pass through the object in the game. It is also worth noting that the game will not run a map if one footprint overlaps another.

Get Texture (CTRL + G)
This changes the mouse pointer to pipette mode. Clicking on a tile texture in the 2d or 3d map display will then select that tile texture for painting with.
Note: If you select a tile texture that has been flipped or rotated, and that flip or rotation is not reflected in the tile's Texture Flags (see The EditWorld Display, Tile Texture Display), you will find yourself painting with the original version of the tile.
Paint Texture/Object (CTRL + B)
This allows you to paint using the currently selected texture or object (see The EditWorld Display, Tile Texture Display) in the 2d map display and the 3d map display.
When you have a texture selected you can hold down the left mouse button to paint large areas with the same texture. A texture's Texture Flags (see The EditWorld Display, Tile Texture Display) are effective in this mode.
Objects must be placed individually by clicking the left mouse button on the map. Once you have placed an object on the map you can right click on it to bring up the properties dialog:
(click to zoom) | Name (can't be changed) - This is the name of the type of object that you are editing. Class (can't be changed) - This is the type of object that you are editing (e.g. structure etc.). Unique ID (can't be changed) - This is the unique identification number of the object that you are editing. You do not need to concern yourself with this. Player ID - This allows you to change the player identification number for the object that you are editing. For instance, player 1 buildings have a Player ID of 1. Position X, Y, Z - This allows you to change the co-ordinate of the object that you are editing. Rotation X, Y, Z - This allows you to change the rotation properties of the object you are editing. It is best not to type in rotation values, but to use the rotate object icon (see Icons, Rotate Object). Game Position X, Y, Z (can't be changed) - This shows the co-ordinate of the object that you are editing in world (W) co-ordinates. |

Fill Textures (CTRL + F)
This allows you to flood fill areas with the selected texture object (see The EditWorld Display, Tile Texture Display) by clicking in the 2d map display or the 3d map display. A texture's Texture Flags (see The EditWorld Display, Tile Texture Display) are effective in this mode.
Paint With Edges (ALT + B)
This allows you to paint using the currently selected edge brush. See Drop Down Menu Options, View Menu, Edge Brushes for more information on edge brushes.
Fill Using Edge Brush
This allows you to flood fill using the currently selected edge brush. See Drop Down Menu Options, View Menu, Edge Brushes for more information on edge brushes.
Create Routing Gateway
When you have this option selected routing gateways and the zones between them will be displayed in the 2d map view. Each zone has it's own number, and this number is displayed on every tile in a zone.
Maps need to be broken up into zones to speed up routing (unit movement, also known as pathfinding) operations. Zones are separated by routing gateways. Create routing gateways by using the mouse to select straight lines of tiles that seal off one zone from another. Gateways should not be more than 5 or 6 tiles in length. Use blocking tiles such as cliffs to break up the map into managable sections, then place gateways at the entrances to these sections to create zones. Try to avoid having to many gateways as this may slow the game down. Note also that computer players build walls along gateways.
The zone numbering system is updated when you either re-select the Create Routing Gateway icon or select Drop Down Menu Options, Map Menu, Refresh Zones. See also the extended section on Creating Routing Gateways.

Apply To Tiles
This changes the properties of the Icons, Drag Vertex option.
Apply To Vertices
This changes the properties of the Icons, Drag Vertex option.
Get Height (Alt + G)
This changes the mouse pointer to pipette mode. Clicking on a vertex in the 3d map display will then select the height of that vertex for painting with.
Paint Height (CTRL + H)
This allows you to paint at the currently selected height (see Icons, Get Height). Clicking on a vertex in the 3d map display will change the height of that vertex to the currently selected height. You can also hold down the left mouse button and run the mouse over several vertices to change all of them in one action.
Paint At Sea Level (ALT + H)
This allows you to paint at sea level. Clicking on a vertex in the 3d map display will change the height of that vertex to sea level. You can also hold down the left mouse button and run the mouse over several vertices to change all of them in one action.
Drag Vertex (CTRL + D)
This changes the mouse pointer to a pair of pliers. Using this mode you can drag vertices up and down in the 3d map display, thus changing their height values. Basically this is how you add new height to the map manually if your not using a height map.

Mark Area (CTRL + A)
This allows you to drag a box over an area in the 3d map display or the 2d map display using the mouse. The area you have selected can then be copied to the clipboard or flipped (see Icons, X Flip Marked Area, Y Flip Marked Area, Copy Marked Area To Clipboard).
X Flip Marked Area
This flips the contents of the currently marked area (see Icons, Marked Area) horizontally.
Y Flip Marked Area
This flips the contents of the currently marked area (see Icons, Marked Area) vertically.
Copy Marked Area To Clipboard (CTRL + C)
This copies the contents of the currently marked area (see Icons, Marked Area) to the clipboard.
Paste From Clipboard (CTRL + V)
This allows you to paste the contents of the clipboard (see Icons, Copy Marked Area To Clipboard) into the 2d map display or the 3d map display. The current paste preferences (see Icons, Set Paste Preferences) are taken into account. This is a good way to do multiple bases instaed of redrawing them over and over again.
Set Paste Preferences
This brings up a dialog allowing you to edit the marked area paste preferences (see Icons, Paste From Clipboard):
(click to zoom) | Heights Tick this if you want to paste height values from the clipboard. Textures Tick this if you want to paste tile textures from the clipboard. Objects Tick this if you want to paste objects from the clipboard. |

Export Clipboard
Same as "Export Clipboard" on the File Menu.
Import Clipboard
Same as "Import Clipboard" on the File Menu.

Set Tri Direction 1 (CTRL + T)
This allows you to click on a tile in the 3d map display and change the direction of the triangle rendering on that tile's surface. Changing the triangle rendering direction can be useful in avoiding rendering errors in the Warzone 2100 game engine, especially at boundaries between land and sea.
X Flip Tile
This allows you to click on a tile texture in either the 2d map display or the 3d map display and flip that tile texture horizontally.
Y Flip Tile
This allows you to click on a tile texture in either the 2d map display or the 3d map display and flip that tile texture vertically.
Rotate Tile
This allows you to click on a tile texture in either the 2d map display or the 3d map display and rotate that tile texture 90 degrees clockwise.

See also: Options Menu → Terrain Types.
Sand
This changes the terrain type of any tile texture you select to Sand.
Green Mud
This changes the terrain type of any tile texture you select to Green Mud.
Water
This changes the terrain type of any tile texture you select to Water.
Road
This changes the terrain type of any tile texture you select to Road.
Baked Earth
This changes the terrain type of any tile texture you select to Baked Earth.
Sandy Brush
This changes the terrain type of any tile texture you select to Sandy Brush.
Red Brush
This changes the terrain type of any tile texture you select to Red Brush.
Pink Rock
This changes the terrain type of any tile texture you select to Pink Rock.
Sheet Ice
This changes the terrain type of any tile texture you select to Sheet Ice.
Slush
This changes the terrain type of any tile texture you select to Slush.
Cliff Face
This changes the terrain type of any tile texture you select to Cliff Face. Tiles with this type are treated as blocking tiles by the Gateway system and the game.
Rubble
This changes the terrain type of any tile texture you select to Rubble.
Keyboard Shortcuts
Note: Some of the Drop Down Menu Options and Icons have keyboard shortcuts. See the sections on these features for more information.
| Shortcut | Action |
|---|---|
| L | Varies the yaw of the lighting in the 3D map view. |
| K | Varies the pitch of the lighting in the 3D map view. |
| E | Rotates the tile beneath the mouse pointer in either the 2D or 3D map view 90 degrees anti-clockwise. |
| R | Rotates the tile beneath the mouse pointer in either the 2D or 3D view 90 degrees clockwise. |
| X | Flips the tile beneath the mouse pointer in either the 2D or 3D view horizontally. |
| Y | Flips the tile beneath the mouse pointer in either the 2D or 3D view vertically. |
| W | Increases the draw distance in the 3D map view. |
| Q | Decreases the draw distance in the 3D map view. |
| – | (numeric key pad) Rotates the map around the camera in the 3D map display. |
| + | (numeric key pad) Rotates the map around the camera in the 3D map display. |
| Ctrl+O | Open project. |
| Ctrl+S | Save project. |
| Ctrl+U | Undo. |
| Ctrl+G | Get texture. |
| Ctrl+B | Paint Object/Texture |
| Ctrl+F | Fill textures. |
| Ctrl+H | Paint height. |
| Ctrl+D | Drag vertex. |
| Ctrl+A | Mark area. |
| Ctrl+C | Copy Marked Area to Clipboard. |
| Ctrl+V | Paste from Clipboard. |
| Ctrl+T | Set Tri Direction 1 |
| Alt+B | Paint with edges. |
| Alt+H | Paint at sea level. |
| Alt+G | Get height. |
| Esc | Select |
| F1 | Look North |
| F2 | World (brings back 2D map) |
| F3 | Edge brushes (brings up edge brush section where 2D map is) |
Known Bugs
The following bugs have been listed by Pumpkin Studios:
- The tile co-ordinates do not update when you scroll using the cursor keys.
- Selecting New from the File Menu does not clear the current .lnd filename, so that selecting save afterwards can save over a previously edited .lnd file.
- The export functions do not currently check for buildings being on top of each other.
- The Save Map Segment option from the File Menu crashes if you attempt to save a map segment not within the bounds of your map.
- The Recently Accessed .lnd Filenames List on the File Menu has a pitfall in that you are not given the option of saving your changes when you click on another .lnd file to load.
- If you start EditWorld, load a map and use the pipette straight away you end up painting with a crate object rather than the texture you have selected.
- If you select (using the pipette) a tile texture that has been flipped or rotated, and that flip or rotation is not reflected in the tile's Texture Flags (see The EditWorld Display, Tile Texture Display), you will find yourself painting with the original version of the tile. The pipette ought to pick up tile textures with flipping and rotation information intact.
The following bugs and workarounds are from the Edit World FAQ by Shang:
| Problem | Solution / Workaround |
|---|---|
| The editor won't start, but complains something about 'mfc4260.dll'. | Download a mfc4260.zip from ftp://ftp.simtel.net/pub/simtelnet/win95/dll/mfc4260.zip or download the lastest editor packange from http://www.pumpkin.co.uk which includes the right version of the dll. The dll must be extracted to the Warzone directory or windows system directory (default c:\windows\system\). If you upgrade EditWorld, always remember to uninstall the old version first (from Control Panel->Add/Remove Programs). |
| When I choose 'New' or 'Open' the editor gives an error message 'wdgLoadAdditionalHeader unable to read from test.wdg'. | If you run the MakeWDG.exe it creates an empty test.wdg file in the Warzone directory. The editor tries to read this file, but it contains no data, resulting in error. Just delete the test.wdg file to correct this problem. |
| There are no objects on the sidebar, only terrain textures. | Copy ObjectList.txt from the mapSaves directory to your main Warzone directory. |
| The editor crashes when I click on the 'Create Routing Gateways' button. | There is a bug in the editor which crashes the program if you haven't activated the 2D screen before clicking this button. Bring up the 2D map (its below the 3D map) and activate it. Now you can lay down Gateways (you can only do this in the 2D map anyway). |
| I get the following error message: 'DDERR_NODIRECTDRAWHW hardware-only Direct draw object creation is not possible; The driver does not support any hardware. File: D:\Source\Editworld\DirectX.cpp Line: 428'. | There are several things that might cause this. Your video card might not have enough memory, or you might be trying to run the editor in hardware (D3D) mode with a display adapter that is not supported. Try the software mode. |
| When I try to play a map in Warzone I get a 'gwLinkGateways:OutOfMemory' error. | The exact cause for this problem is currently unknown. Double check your Gateways for any anomalities (overlapping Gateways etc.). |
| When I test my map units seem to climb up even the steepest hills. | Units can pass over any tile that has not been marked as 'Cliff Face'. See the EditWorld documentation about tile types for more details. Note: The pathfinding and Gateway routines use this 'unpassable terrain' feature, so you'd better use the tile types, or the AI/pathfinding will be messed up. |
| When I test my map, I cannot build any structures even if the ground is all flat. | You have used a texture which has the tile type 'Cliff Face'. Textures like these cannot be built over. Use another texture or change the texture's type to something else. See the EditWorld documentation about tile types for more details. NOTE: Although buildings generally must be built on flat ground, buildings that only take up one tile (like Hardpoints) can be build anywhere except on 'Cliff Face' and 'Water' tiles. Also, you cannot build on Zones that have no Gateways. Islands are especially vunerable to this error. Check that all islands have Gateways. |
| I get an 'Error: One or more players not in sequence!' message when I try to export my map. | All players included in the map must be in an unbroken sequence i.e. 0, 1, 2, 3 and NOT 0, 2, 5, 7. Also the total number of players can only be 2, 4 or 8. |
| My map works fine, but my trucks cannot build Oil Derricks on some resources. | If an oil resource is too close to the edge of the map the map will otherwise work correctly, but you cannot build oil derricks to these resources. |
| When I try to put down a Gateway I get an error message saying 'Can't put it there'. | Gateways cannot be placed on top of unpassable tiles ('Water' or 'Cliff Face'). |
| The editor automatically adjusts water tiles to sea level. | Uncheck the 'Auto Height Set' option from the options menu. |
Making a New Map
So you've made it this far, now we can get down to the fun part. Create a new map from the File Menu and specify it's settings:
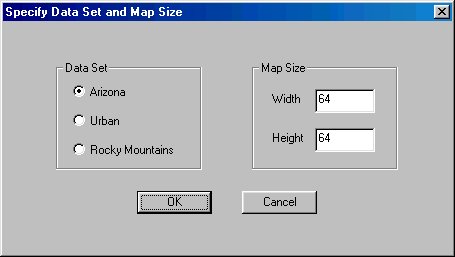
Before we can truly begin though we need to make you have a checklist of what's required...
You should have an idea about:
- what you want to do
- which tileset you wish to use
- name for your map
- number of players
- if you want to include scavengers
If you have all that then your ready to continue. You should be familar with all of the commands now so creating a new project should be of no problem. Make the map the way you want, lay any objects, buildings, etc. you want. Put down the tile you want to use. If your comfortable try using some of the edge brushes or changing the tile types. A few things to double check on your map though before you export it.
- Each player has 1 truck and 1 structure
- All building must have one space between them
- You must have 1 gateway on your map, even if there is no need for it
- Do NOT place objects near the edge of the map or it will crash. Oil resources are the only thing that will not crash the game. Though you will not be able to use them. Always place everything 4 tiles away from the edge of the map.
- Make sure you have either 2, 4, or 8 players on the map and they are numbered as such
- when you export your map make sure to only include letters. No numbers or symbols
- If you include scavengers they must be marked as player 7. They also require 1 oil resource with derrick, a power generator, and a factory
Once you have all these items done you should be able to export your map with no problem. Hopefully you wont run across any problems, so good luck and happy map making.
Edge Brushes
This section covers custom edge brushes, and how to make them. For this section it is highly recommended that you open edit world and follow along.
With edit world open and a map loaded either hit F3 on the keyboard or go to View → Edge brushes. Next, lift up the 2D map:
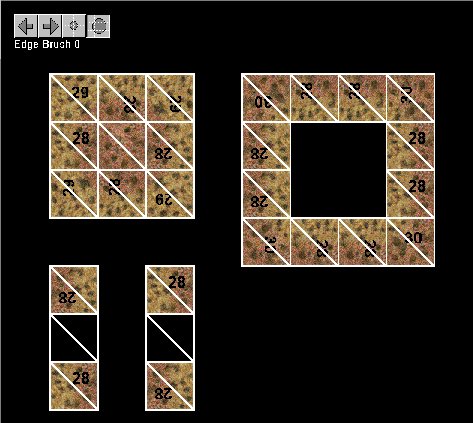
This is what you should see. Look at the 2 smaller ones. These you do not want to have anything in the center of. As for the other 2, paint them like you normally would. You can put different textures into each box. To place the textures into the boxes click the paint texture icon or Ctrl + B. Find the texture you want to add. Once you have it start painting the boxes how you want. You may need to rotate the textures to get them just right. Once you have the edge brushes the way you want you can save them for later use so long as they match the tileset you are using.
Height Maps
Welcome to the wonderfull world of height maps. What can i say, these can greatly help you when creating a new map. Instead of spending hours raising and lowering your map just create one of these beauties. There is very little you will need to know of do. All you really need is a decent Paint program or demo. Pain shop pro is what i recommend to start with, plus its cheaper if you want to buy a full copy.
To start your height map first open the graphics program. Once you have it open create a new file. This file will need to be the exact map size up to 250x250. One thing you must have set, is that this file will be using greyscale color. A note of the greyscale, white is the highest level on the map while black will be for the lowest points. Once you have the pic done how you like, save it.
When finished, open Edit world. Create a new project the same size as your pic. Once you have that done and the dataset loaded import the pcx file into edit world. Thats all there is to it. See how much time you saved?
Creating Routing Gateways
Basic Gateways
Remember that button marked GT? If you dont, don't worry. As you go through this section hopefully you will learn something about gateways, if not just re-read this section.
If you want, you can look at what was originally written by pumkin. What we know about gateways, is anything smaller than 3 tiles doesnt work. It walls the ai in. As for pumkins no more than 5 or 6... well we've had a few people get longer gateways with no prolem. Also, gateway placement is a must. If you dont have your gateways setup properly you map will suck. Below is a minor illistration on a proper gateway.
***_______***
****_____****
****_____****
*****GGG*****
****_____****
***_____*****
**_______****
Where:
- * = Cliff Faces tiles
- G = Gateways
- _ = Passable Terrian
A few additional things you will need to understand about gateways. If you want to do a map with lots of island hoping, you will need to put a gateway on each island you want to be able to use. If you do not put a gateway on each island you WILL NOT be able to use that island for anything, so always double check your gateway placement. The same applies for mountainous maps. Anytime you have a large flat surface with our a ramp leading up to it you will need to add a gateway to it if you wish to build on it.Remember, you can only add gateways on the 2d map
Gateways and Zones
Now that youhave your gateways placed we will continue on with how they split the map into zones. When you add a gateway between unpassable mountain ranges you create a new zone on the map. Edit world will start numbering these and add them in either when you save your map or tell it to refresh zones. Here is an example of what the zones on your map will look like in the 2d map
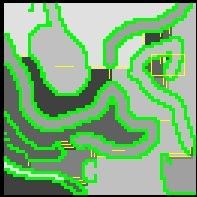
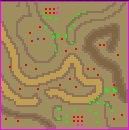
Notice the yellow lines? These are the gateway placements on the map. The different grey areas each represent a seperate gateway. If you look closely, you can see two areas that have a gateway that doesnt create a new zone. These gateways are there so that you can use the high areas on the map with out the need for ramps. To the right you will see what the map looks like in normal viewing on the 3d map.
Pathfinding and Gateways
Now we embark on the final lesson with gateways, pathfinding. The reason on having gateways and zones is to make the vehicle pathfinding easier and quicker. The way it has been discussed before was that the computer will assign a path for each unit folloing each zone. Large numbers of zones will cause problems though when ploting a very long move order as it is forced to cross a large distance. It also helps when the comp must cross between winding areas if they have a clear gateway plan in place. In essence, gateways when dealing with pathfinding are a double edged sword. They are very helpfull on large maps and on maps with lots of broker terrain, but they slow the game down if you place too many. When you start using zones please be careful to "over zone" your map. You may create the most beautiful map in the world, but the units sit there for seconds when given long move orders as they sit there trying to compute how to get there and what zones to pass through.
Terrain Types
Our next topic covers terrain types. Though i dont have much data on this yet i am going to feild this section as best i can for now. If you have edit world open, look at the texture tiles to the left. If you check under options you will see where it says terrain types. Here you will need to click on it to activate it unless it already is. Once active you should see various colored boxes on each tile. These represent the terrain types. Each type has a set value that will either help or slow your units. The exact effect is what i still need to figure out. The ones i do know are obvious.
- Cliff Faces - Unpassable mountain terrain
- Water - only hover units and vtols can pass over water
- Road - Speeds up unit travel (if it keeps with other rts games ive played)
- Rubble - Slows movement? (same as above)
- Snow/Slush - Increased movement with penalties?
- Others - ???
Custom Tilesets
So ya want a custom tileset huh?
Sorry about that, just a little fall back to htmlgoodies. Great site to visit if you want to learn html. Ok, no more rambling, on with the info!
Well here is the easiest way to change the files around. First, copy the tileset you want to use to your \warzone2100\textpages directory. If you created your own custom tiles make sure they are named as such tertilesarizahw.pcx or whatever you named them as. Next open the mapdatasets directory. You should see a file or 3 called WarzonedataC1.eds From here you will want to open them in a TEXT EDITOR (notepad, editpad, etc.) Do not try to open them in word or wordpad. When you have them open you should see several lines of code like this
MISCBEGIN
//Terrain tile texture page
Tiletextures "texpages\tertilesc1.pcx"
Where it says tertilesc1.pcx change it to the name of your tileset. Once you have that done, save the file as warzonedataarizahw.eds. Next create a new map and name it soemthing good. Once you have the map named, edit the map ind file. There will be 2 spots to edit, the first where it asks for dataset. Change the name to your new eds file. The second will ask for the name of the tileset you will be using so change that name as well to whatever your using. If you downloaded any tiles from my site you will notice that the eds files are already included so you can skip a few of these steps.
Once you have all this done, just reopen your map in edit world and you should be looking at your custom tiles :)
Makewdg Properties
As we go into more detailed advanced topics, this is sure to be asked about. I have listed the commands on how each comand line option works as well as (as best i can) a short tutorial on proper use. As most of you know, several map releases by N.E.W.S.T. use custom scripts as well as custom tilesets. The most widely known of these are WarGods, Citadel, Citadel Elite, and ReFlyingin. Though im not going to go into depth about creatin custom scripts this wil more show you HOW to add them to your maps.
Before you can start you will need to have TMLink installed. This is so you will be able to take out the files you need before Edit World can compile them into a map. Once your map is finsihed export as uuall, but when TMlink pops up stop. Bring up your Warzone directory. Once in your warzone directory look for a folder called mapExport. In this folder (after more digging) you will find the map files (*.bjo). These are the files EW compiles for your map before it calls makewdg.
Ok, we are going to use the June25.wdg as our example (as this was the only info I could find). What is listed below was once part of Skorpion's website.
makewdg -v -o "June25.wdg" -x 6 June25 -s 5 may28 -s 4 may21 -s 3 NewTech -s 2 NewMaps -s 1 cam2Tech -s 0 warzone -a multiplay\maps\*.* -a addon.lev -w wrf\*.wrf > June25.txt
Where:
- -v means run verbosely (ie give details as it compiles. Optional)
- -o sets the output filename. You would obviously want to change this.
- -x names the new wdg internally. The number is an index for the file. Higher indicies overwrite lower ones. Therefore to allow for future patches I suggest at least 50.
- -s specifies the files it needs to run, in this case all the other official wdgs. Note that case is important here.
- -a Compiles miscellaneous data into the wdg (in this case some new maps)
- -w States the wrfs to compile.
- > June25.txt writes the outputs generated by -v to the file June25.txt so that you can review any errors produced.
Now that we have that out of the way... lets take an easier look
makewdg -v -o "yourmap.wdg" -x 20 yourmap -s 11 nov.wdg -s 0 warzone -a mapExport\multiplay\map1\*.* -a addon.lev > yormap.txt
This should tell you that you want to compile a map named "yourmap" using the data for 1 map only. It is very important that you include the addon.lev file Without it your map wont work (or be recognized).
Custom Scripts
For custom scripts you will need to review the Script Language reference file provided by pumpkin in your multiplay\skirmish directory. This directory also includes all of the AI files used for kirmish games as well. If, after reading the scriptlanguage file you decide NOT to do any scripting no problem, you can still create other custom items for your map.
Creating custom scripts
So you opted to create a map with custom scripts. If you are creating a custom AI for your map you will need to use skirmishAI 0-7 not player 0-7 as is in the multiplay\skirmish directory. Im not exactly sure why this is.. mostly a game issue I believe. Its best to write down what you want fromthe script before you try coding it. Also of importance.. make sure that when you start writing your script that you use a text editor such as notepad or editpad. You will also need to save the files using the slo or vlo extensions.
Coding scripts
My advice here, use wdg explorer to open up tha main warzone.wdg file and read through some of the scripts to get an idea of how they work and what they do.
Adding scripts to you map
As you saw in our example, there is a wrf file that some wdg files are compiled with (pretty much all of em)
The wrf files basicaly tell makewdg what to add to the files. Which text files and slo/vlo file to include. It is very important that you use the correct directory paths when building these files. If they are not set up correctly it will screw up everything your trying to do.
/*
* Cam3-4.wrf
*
*/

/* Directory for Proximity messages and mission briefs */
directory"messages"

fileSMSG"brief3-4.txt"
fileSMSG"prox3-4.txt"

/* Directory for uncompiled script files */
directory "script\text"

fileSCRIPT"setdisk.slo"
fileSCRIPT"genexp.slo"
fileSCRIPT"VTOLS2.slo"
fileSCRIPT"cam3-4X.slo"
fileSCRIPT"cam3daynight.slo"

/* Directory for compiled script files*/
directory "script\binary"

/* Directory for script value files*/
directory "script\data"
file SCRIPTVAL "cam3-4.vlo"
file SCRIPTVAL "disk1.vlo"
file SCRIPTVAL "VTOLS3-4.vlo"
file SCRIPTVAL "cam3-4X.vlo"
file SCRIPTVAL "cam3mkday.vlo"
I couldnt import this with spaces.. so i have included a wrf file to go along with this. The hardest part will really be to write the custom scripts. Well thats all on the map end. If your lucky ill write a file on scriptin.
These days, people use FlaME to edit maps.
Contents