![]() This is a very old map editor. Use the new map editor instead: FlaME
This is a very old map editor. Use the new map editor instead: FlaME
EditWorld - Beginners Guide
- Aubergine
What do I need?
All you need is the Warzone World Editor (EditWorld) and some free time on your hands. Having this guide handy might help too! This guide is intended as a supplement to the EditWorld help files from Pumpkin Studios. My manual is meant as a supplement for beginners who need more help with the basics.
Making a height map
To get started with your first map, it is highly recommended that you create a gray scale image of the terrain you want in your map. This is much simpler than it sounds. All you need is any painting program for the PC that can save in PCX format.
Make sure you only paint in black and white, which gives you 256 levels of gray.
The only other rules are that you will need to save the final picture in PCX format, and at a final size in pixels that is equal to the map size in tiles. So if your map is going to be 100 by 100 tiles, the PCX file should be 100 by 100 pixels. The maximum map size with Edit World is 250 x 250 tiles.
The basic idea is that the highest areas on the map painting are represented by white, and the lowest areas are represented by black.
If you want a steep or sheer cliff face to show up in the final map, make sure the transitions between black and white areas are sharp. If you want smoothrolling hills, use gradients of gray to make smooth height transitions on the map.
Sea level will be at the lowest point on the map, which corresponds to the black areas.
The idea is to make the lay of the land using various shades of gray. Plan your map carefully at this stage, because the height map really defines what the final map will look and play like. While you can edit the map in the editor, it's a lot faster if you get the initial height map right first time.
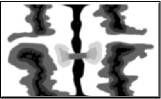
Note that you can paint your map at a larger size than the final dimensions as long as your paint program allows you to size the picture to the correct final dimensions. Don't forget to save the map in the .PCX file format. The heightmap I made for my map called ValleyForge is shown above.
Selecting a Texture Data Set and Map Size
Now that you have your height map ready, you can start Edit World.
When you create a new map you will need to select a texture set. There are three built-in data (texture) sets, one is called Rocky Mountains, another is called Arizona, and the final one is called Urban. Each one uses different tile texture sets. You'll need to get the hang of each of the different tile texture sets to use them effectively. However, you only use one texture set per map. In practice, you will only paint with individual tiles when doing touch-ups. To paint whole areas it is much better to use the so-called edge brushes, which I'll get to shortly.
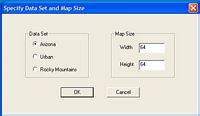
After you decide which one of the data sets to use, you need to decide how large you want the map to be. A small two person map can be in the 64x64 range, while four player maps should be in the 150x150 range. Large maps are in the 250x250 range. Remember to set the size of the map equivalent to the dimensions of your height map in pixels.
The texture / feature window is on the left side of the screen. Each texture/feature-set also includes all the buildings, hardpoints, and other features you'll need to make a finished map. You can scroll up and down the texture/feature set using the scrollbar at the right side of the texture window.
Importing the height map
After you select the texture set and size of the map, and click on the OK button, you'll have to wait a short time while Edit World generates a blank map. At that point you can go to the Map Menu and import your height map.
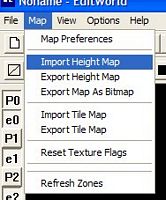
Select import height map from the Map Menu, and navigate to the directory where you saved the PCX file. Select the file and import it. Now your map will have the correct texture/data set, will be at it s final size, and will have all the height data that you painted into the height map.
To rotate the lighting on the map, use the K and L keys (see: Keyboard Shortcuts for more info). This will help you see the hills and valleys you created with the height map. Zooming and rotating the map can be done with the number keypad keys and mouse.
Starting to draw the map
The basic idea behind map painting is to use the edge brushes to paint out water, mountains and other features that limit vehicle movement on the final map.
The rule here is that each texture tile is assigned to a particular terrain type (water, dirt, ice, cliff etc.). The terrain types assigned to the texture tiles are changeable, meaning that you can define which textures are cliff face (impassable), and which are dirt (passable). This is a key feature of Edit World.

You'll notice a series of buttons along the top of Edit World which have colored squares in them. You can hover the mouse button over a colored square to get a description of it. The main point here is that different terrain types limit vehicle movement on the map in different ways. Obviously, water limits movement to only hovercraft or aircraft. Setting a particular texture tile to cliff face makes terrain painted with that tile type impassable to all but aircraft. Painting mountain ranges with texture tiles that have been designated cliff face partitions the board into distinct areas.
Choke-points between these cordoned off areas will be assigned gateways later in the map production process. Gateways facilitate vehicle movement between different areas on the map. We will get to that topic shortly.
In order to change the attributes for a particular texture tile, let's say the one that looks like grass in the Rocky Mountain texture set, simply click on that particular tile in the texture / feature window, and then click on the coloured square button above to set the terrain type for that texture.
Edge brushes
Each of the three texture/feature sets comes with its own set of edge brushes. Edge brushes are collections of related texture tiles which, when used to paint areas on the map, create finished regions of grass, water, rock, or other terrain features. The reason they are called edge brushes is because they produce finished edges around the terrain you're painting. So, for example, if you want to paint a lake in the middle of your map, you would select the edge brush that has water tiles towards the center and grass tiles towards the edge
 You can select to paint with either a large, or small edge brush depending on whether you are trying to cover a large or small area of the map. To call up the edge brush utility, simply press the F3 key. There are 15 pre made edge brushes for each texture/feature set. You can make your own brushes in the lower right hand window if you so desire. However, the 15 edge brushes you are given for each texture/feature set should be enough to finish up a professional looking map. To paint on the map in the upper right hand window, click on the edge brush painting icon at the top of the screen (paint with edges icon, or use the Alt-B key combination).
At this point it will be useful to talk about the various windows in Edit World. I have already mentioned the texture/feature window on the left side of the screen. The right side of the screen is split into two windows. The top window is where you will do your map painting with edge brushes. The window below that is where you will set gateways between different parts of your map.
You can also design new edge brushes in the lower right window after pressing the F3 key. You can also change between the edge brush view and the world view in the lower right panel by going to the view menu. Also, don't forget that you can resize the two right panels by dragging the bar between them up or down.
So, start painting out your different terrain with edge brushes. Mountain and rocky terrain will typically be given a status of .cliff face. (using the buttons with colored squares in them at the top of the screen). This makes these painted areas impassable to ground or hover vehicles. Limiting ground vehicle movement this way is a critical design aspect of the game. Wide open boards are often very boring. So plan out your .impassable. terrain carefully.
Make sure that different regions of the board are separated from each other, with connecting valleys or zones that are restricted in size. Try not to make choke-points that are too small though, as ground vehicles will tend to bunch up if the passages are too narrow. I try to keep gateways on my maps at least four tiles wide. When it comes to making mountain ranges or bodies of water, don't consider doing it without the edge brushes. It is not only quicker to use edge brushes, it produces much better results. When painting bodies of water, you may want to force the height to sea level where ever the water goes. If so, select auto height set in the options menu.
Texture touch ups
In many cases edge brushes will not produce a perfectly smooth edge transition, and you will need to go back and touch up some spots with individual texture tiles. This takes some practice and getting used to. To paint with individual textures, use the paint texture/object button (or hit Ctrl-B). A shortcut that can really speed up this touch-up process is to use the texture rotate keys on the keyboard. To do this, simply hover the mouse pointer over the texture that you want to rotate, and use the R and E keys. So the basic idea is to put down individual texture tiles where needed, and then use the R and E keys to rotate them to the proper orientation.
Routing Gateways
Now that you have determined the lay of the land and the terrain types (water, land, cliff face, etc.), it is time to decide where to place the routing gateways in order to expedite traffic between zones. Enlarge the lower right window by grabbing the bar between it and the upper window, and dragging the bar upwards while holding the left mouse button down. If you have an edge brush selected, this window will be showing the edge brush set rather than the map. To change to the map view, go to the view menu and select world , or you can hit the F2 key. To move around your map in this window you can use the arrow keys on the keyboard, or point to an area in the mini-map, which located in the upper left part of the window. Clicking on the mini-map instantly moves your view to that spot on the map.
***_______***
****_____****
****_____****
*****GGG*****
****_____****
***_____*****
**_______****
Where:
* = Cliff Faces tiles
G = Gateways
_ = Passable Terrian

To add a gateway to a narrow gap between mountains on your map, click on the button labeled Gt at the top of Edit World. Now you can place gateways on the map in the lower right-hand window. Left-click once where you would like the gateway opening to start (for example at the left side of the narrow gap at the entrance to a base), and then right-click where you would like the gateway to end.
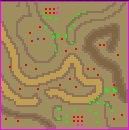
Gateways must be at least two tiles wide, and I recommend three or four tiles at least to prevent vehicle bunch-ups. The best way to discuss routing gateways is with an example. Let's say you've created a map where each base is ringed by impassable mountains, and has only one narrow opening. You would put a routing gateway at the narrowest point of the entrance to each base. Notice the yellow lines? These are the gateway placements on the map. The different gray areas each represent a separate gateway. If you look closely, you can see two areas that have a gateway that doesn't create a new zone. These gateways are there so that you can use the high areas on the map with out the need for ramps. To the right you will see what the map looks like in normal viewing on the 3d map.
Keep in mind that you can only lay down gateways in either horizontal or vertical lines. That is, you can not have diagonally oriented gateways. So when making a map, try to play-test the game to see if they're working properly. Under the Map menu there is an option called Refresh Zones. This updates the map after you have added gateways. What will happen after placing gateways and using the Refresh Zones option, is that each area of the board separated by gateways is assigned a unique number. Complex maps with make the gaps between areas so that they face either north-south, or east- west. This way you can make a vertical or horizontal gateway at each major choke-point on the map. You will have to play around with gateways, and then 8 bases and water areas can end up with 30 or more numbered zones. These are separated by mountains, water, and other movement limiting textures, with gateways designating the passable routes for ground vehicles to move between the numbered zones. If your map does not have any gateways it will not compile and you will not get a functional map. Every map must have at least one gateway. Good maps will have a significant number of gateways strategically placed at the narrowing between zones.
Building bases
In the left-hand window, you will notice that you not only have textures for painting out different terrain types, but you also have a section that includes buildings, and one that contains other features. If you scroll all the way to the bottom of the left window you can choose several vehicle types to be placed on the starting map. One of these, the truck, is required for each base. That is, each base that you make on the map must have at least one truck and one oil well. In addition, each base must have at least one building. All other buildings and features are optional. Placed buildings can be moved around by selecting the move button at the top of the screen. Features and buildings are placed on the map the same way textures are, using the paint texture/object button at the top (or hit Ctrl-B).
It is relatively simple to manage players while building bases. The P0/e0 through P7/e7 buttons at the left side of the screen control which base you are working on at any given time. Only one of the P buttons can be pressed at once, and that is the player you are working on. So first press the P0 button, and place all of Player 0's buildings in their base. Then press the P1 button, and place all of Player 1's buildings, etc. Two-player maps will only include buildings for player P0 and P1. Four-player maps will include buildings for players P0 through P3, and eight-player maps will involve players P0 through P7. All of the e buttons can be pressed at the same time, in which case you will be looking at everyone's base structures simultaneously. If you want to limit your view to only one player s structures, turn off all of the e buttons except for the one you are working on. To get all of the buildings you placed in each base to show up at the start of a game, you need to select Tech-Level 3 before selecting the map.
NOTE: just make sure that the proper ( e ) button is pushed when working with these i.e. p0 is chosen so should e0 and so on - if not you could have a very rough time trying to figure out why your base is being attacked - its because you put some of your items in one of the other 7 bases - trust me - this detracts from playing that map. Coyote25
Adding features
When you are satisfied with your map layout, gateway placement, and base construction, it is time to add the finishing features. These include destroyed buildings, trees, oil tanks and other tidbits to populate the board with. They often make the board more interesting to look at and play on. Many of these features can be destroyed by gunfire in the game, so they do not permanently block access to areas. Use these features as freely as you like. Obviously, one key feature to good map making is the placement of oil wells around the map. Much of Warzone strategy revolves around fighting for oil wells outside of your own base. The total number of oil wells on a particular map greatly affects the overall gameplay. Try various numbers of oil wells and oil well placement to optimize the strategic effectiveness of the map.
Saving and tweaking your map
Save your Edit World map files regularly as you put them together. These internal Edit World files have a .Ind file suffix and can only be read by Edit World. When you are ready to try out your new map, all you need to do is select Export Multi Player Map from the final menu. You will need to give the map a name at this point, and then click on OK. Just use letters, no numbers or symbols. The program will then list basic parameters such as number of players, number of units, etc.
When you finish the export process, you will see a DOS window flash by for a brief second. At this point you are done (barring any error messages). now you can play test your map and go back and tweak it after you have some experience with unit behavior. You may find, for example, that units tend to bunch up at a particular spot on the map where there is an impassable region such as a mountain range. You have two options to try and correct this. One is to change the placement of gateways near the spot where units bunch up. The other option is to knock a hole in the mountain range at the bunch-up point. This can be done quite easily with an edge brush that changes a segment of mountain range (designated cliff-face in the terrain types) to a section of grass or dirt. You will probably have to touch up around the edges with individual textures to get the new opening to look smooth. Don t forget to put a new gateway in the new opening you just made. Hit the refresh zones button (map menu) to see the new area designations created by the new hole and gateway.
Save the map and export a multi player map from the File menu. Give your map another spin and see what else you can do to improve gameplay. You may discover that your height map needs some minor tweaking here and there. If so, use the drag vertex button at the top of the screen. Grab individual dots, and while holding the left mouse button down, drag the dot up or down. This will raise or lower the terrain at that point. This is a tedious process, so try to get your height map done just right before starting your new map.
As a general rule, it is a good idea to play test your map as early in development as possible. Put in your mountains, water, gateways and basic bases. Then play test thoroughly before finishing up the bases, and adding the finishing features.
www.KickAssGear.com
It has been adapted for use with EditWorld32.
Contents
Jump to: